동기와 비동기
synchronous & asynchronous
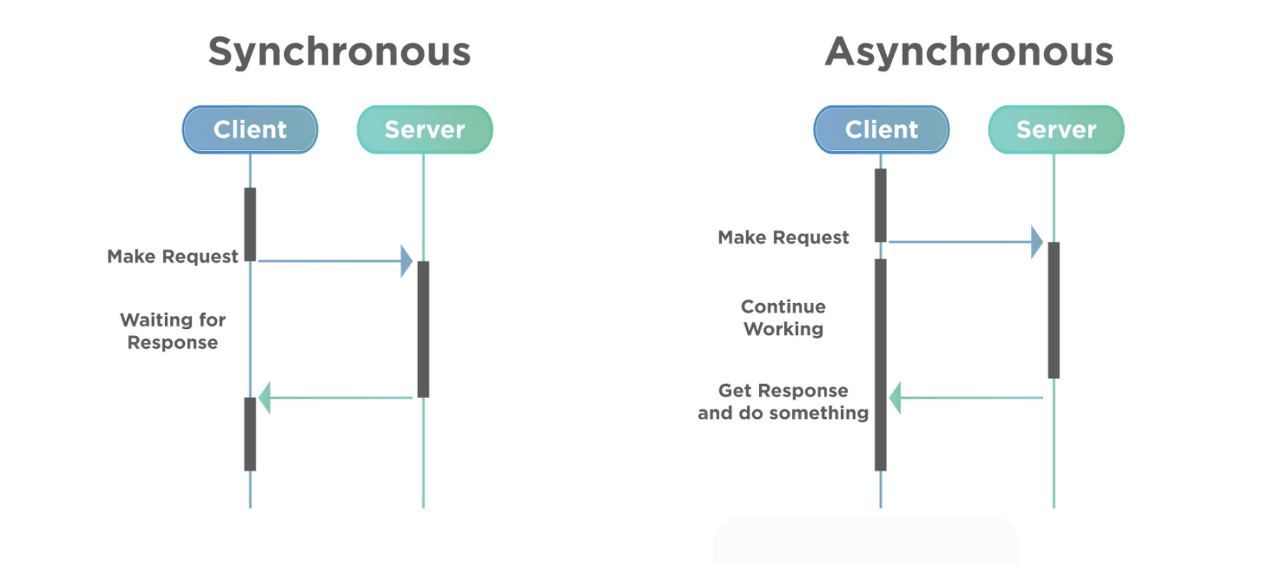
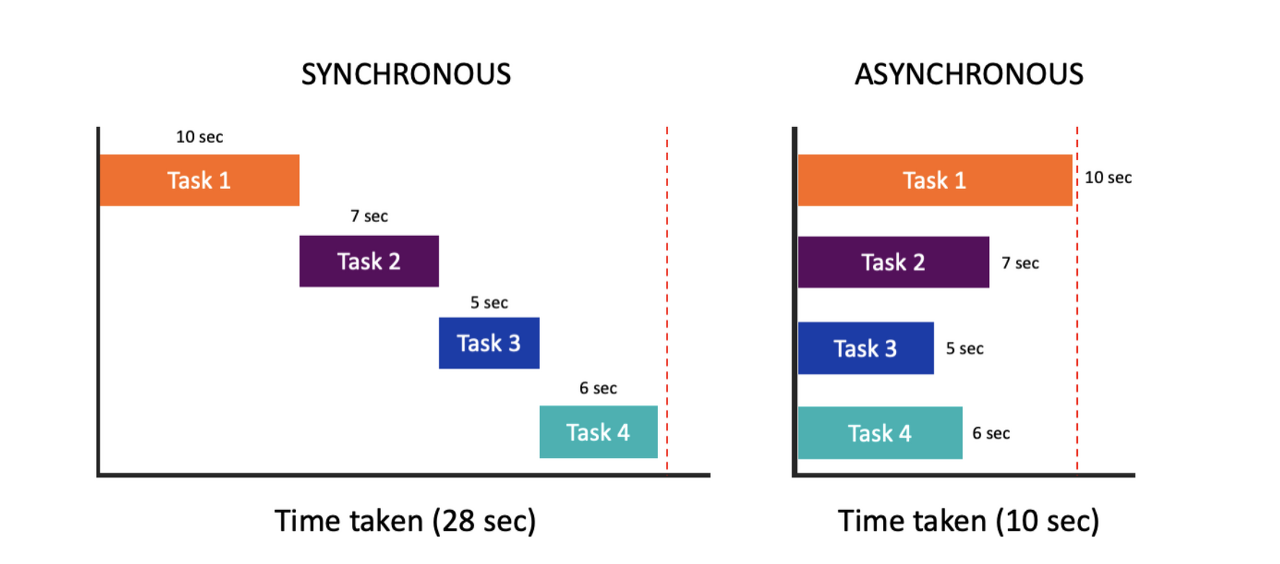
- 동기적(synchronous) : 시작 시점과 완료 시점이 같은 상황으로 자바스크립트는 synchronous
*코드가 나타나는 순서에 따라 시행되며 요청에 대한 결과가 나올 때 까지 기다림 - 비동기적(asynchronous) : 요청에 대한 결과가 나올 때까지 기다리지 않음(continue working)
*콜백 함수를 많이 활용
blocking & non-blocking
- blocking : 요청에 대한 결과가 동시에 일어남
(하나의 작업이 끝날 때까지, 이어지는 작업을 "막는 것"을 blocking이라고 함)
*전화처럼 하던 일을 멈춰야 함 - non-blocking : 요청에 대한 결과가 동시에 일어나지 않음
*문자처럼 나중에 확인할 수 있음
Callback
- 비동기 : 실행 순서와 관계 없이 먼저 끝나면 바로 출력
- Callback : 비동기의 순서 제어 가능
*parameter를 넘겨받는 함수는 콜백 함수를 필요에 따라 즉시 실행(synchronous)할 수도, 나중에 실행(asynchronous)할 수도 있음 - Callback 중첩 시 관리 어려워짐 : Callback Hell
*promis 활용하여 callbcak 중첩을 벗어날 수 있음
1. iterator(반복 실행하는 함수)
let arr = [1, 2, 3]

arr.map((el) => {
  return el * el
})
//[1, 4, 9]
2. event handler(이벤트에 따른 함수)
document.querySelector('#btn').addEventListner('click', (e) => {
  console.log('button clicked')
})- 함수 자체를 연결 : 함수 실행을 연결하면 안됨
3. Callback 함수 사용 예제
//콜백 미사용
const printString = (str) => {
  setTimeout(
    () => {
      console.log(str)
    },
    Math.floor(Math.random() * 100) + 1
  )
}

const printAll = () => {
  printString("Despair")
  printString("Monkey")
  printString("Ukkikki")
}

printAll()
// 랜덤하게 출력
//콜백 사용
const printString = (str, callback) => {
setTimeout(
() => {
console.log(str)
callback()
},
Math.floor(Math.random() * 100) + 1
)
}
const printAll = () => {
printString("Black", () => {
printString("Cat", () => {
printString("KKAKKA", () => {
})
})
})
}
printAll()
// 순서대로 출력
Promise
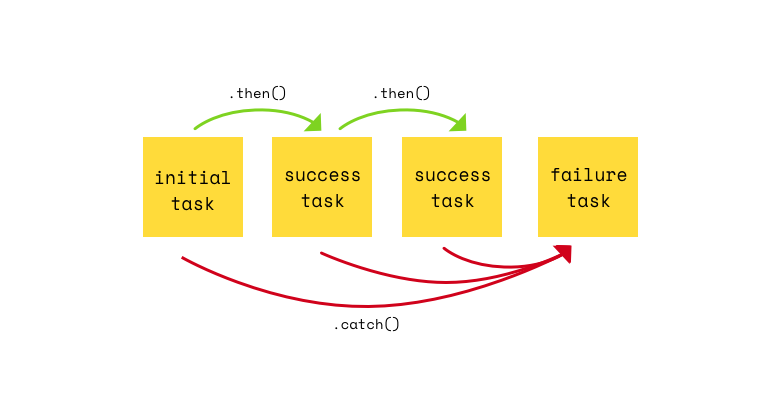
- 오래 걸리는 비동기 작업을 미리 시켜두고 비동기 작업의 결과를 나중에 확인할 것을 약속
- 3가지의 상태가 존재 : pending, fulfilled, rejected
Promise의 3가지 상태
1. pending
- 아직 작업이 끝나지 않은 상태
2. fulfilled
- 작업이 성공한 상태
- resolve('성공한 결과')
*.then(('성공한 결과') => {})
3. rejected
//사용방법
new Promise((resolve, reject)=>{
  if(조건) {
    resolve('성공!');
  }
  reject('실패');
})- 작업이 실패한 상태
- reject('에러')
*.catch(('에러') => {})
//예제

// Producer
const printString = (str) => {
  return new Promise((resolve, reject) => {
    // Promise : resolve와 reject를 인자로 넣어 실행
    // resolve : 실행 순서 핸들링
    // reject : 에러 핸들링(.catch())
    setTimeout(
      () => {
        resolve(console.log(str))
      },
      Math.floor(Math.random() * 100) + 1
    )
  })
}

// Consumers : then, catch, finally
const printAll = () => {
  printString("Despair")
  .then(() => {
    return printString("Monkey")
  })
  // 리턴까지 다 끝나고 .then
  .then(() => {
    return printString("Ukkikki")
  })
}

printAll()
// 순서대로 출력- callbcak 핸들링 가능
- new Promise() : 인스턴스 생성
*resolve() & reject() 명령어 존재 - .then으로 순서 지정
- .catch()로 에러를 잡음
*에러 핸들링을 매 콜백마다 해주지 않고 마지막 체인에 위치시켜도 됨 - .finally() : 성공, 실패 관계없이 무조건 마지막에 호출
- Promise Hell도 발생 가능
*return 처리를 잘 해주면 Promise Hell을 방지할 수 있음
//예제

// Producer
const printString = (str) => {
  return new Promise((resolve, reject) => {
    // Promise : resolve와 reject를 인자로 넣어 실행
    // resolve : 실행 순서 핸들링
    // reject : 에러 핸들링(.catch())
    setTimeout(
      () => {
        resolve(console.log(str))
      },
      Math.floor(Math.random() * 100) + 1
    )
  })
}

// Consumers : then, catch, finally
const printAll = () => {
  printString("Despair")
  .then(() => {
    return printString("Monkey")
  })
  // 리턴까지 다 끝나고 .then
  .then(() => {
    return printString("Ukkikki")
  })
}

printAll()
// 순서대로 출력
//Promise Hell

function goToCatTower() {
  return new Promise ((resolve, reject) => {
    setTimeout(() => { resolve('1. go to bananatower') }, 5000)
  })
}

function takeANap() {
  return new Promise ((resolve, reject) => {
    setTimeout(() => { resolve('2. take a nap') }, 4000)
  })
}

function eatLunch() {
  return new Promise ((resolve, reject) => {
    setTimeout(() => { resolve('3. eat lunch') }, 3000)
  })
}

function goToBad() {
  return new Promise ((resolve, reject) => {
    setTimeout(() => { resolve('4. go to bad') }, 1000)
  })
}

goToCatTower()
.then(data => {
  console.log(data)

  takeANap()
  .then(data => {
    console.log(data)

    eatLunch()
    .then(data => {
      console.log(data)

    goToBad()
    .then(data => {
      console.log(data)
    })
    })
  })
})
//Promise
goToCatTower()
.then(data => {
  console.log(data)
  return takeANap()
})
.then(data => {
  console.log(data)
  return eatLunch()
})
.then(data => {
  console.log(data)
  return goToBad()
})
.then(data => {
  console.log(data)
})
//async await
//Promise를 마치 동기적인 것처럼 사용 가능
//*코드 가독성을 높여줌

const result = async () => {
  // async 함수임을 표현
  const one = await goToCatTower()
  // await 사용
  console.log(one)

  const two = await takeANap()
  // await 사용
  console.log(two)

  const three = await eatLunch()
  // await 사용
  console.log(three)

  const four = await goToBad()
  // await 사용
  console.log(four)
}

result()
4. fetch API : 네트워크 요청
- fetch API를 활용하여 URL로 요청하는 것이 가장 일반적
- fetch : 특정 URL로부터 정보를 받아오는 역할 수행
- 시간이 소요되는 작업을 요구할 경우에는 blocking이 발생할 수 있어 특정 DOM에 정보가 표시될 때까지 로딩 창을 대신 띄우는 경우도 있음
- Promise의 형식으로 이루어짐
- .json() 메소드를 사용
*.json()은 response의 스트림을 가져와 스트림이 완료될때까지 읽은 후, 다 읽은 body의 텍스트를 Promise형태로 반환
let url =
"http://ec2-13-124-90-231.ap-northeast-2.compute.amazonaws.com:81/flight"

fetch(url)
  .then((response) => response.json())
  // 자체적으로 json() 메소드가 있어, 응답을 JSON 형태로 변환시킨 다음 Promise로 전달
  .then((json) => console.log(json))
  // 콘솔에 json을 출력
  .catch((error) => console.log(error))
  // 에러 발생 시 에러 출력
console.log(respose)

console.log(json)

Node.js
1. 브라우저
- 브라우저에서 사용할 수 있는 비동기 흐름 : 타이머 혹은 DOM 이벤트와 관련된 상황타이머 API
- 1-1. setTimeout(callback, millisecond)
1-2. clearTimeout(timerId)
2-1. setInterval(callback, millisecond)
2-2. clearInterval(timerId)
2. Node.js
- Node.js : 효율성을 위해 non-blocking하고 비동기적(asynchronous)으로 작동할 수 있도록 개발한 비동기 이벤트 기반 자바스크립트 런타임
*많은 API가 비동기로 작성 - 로컬 환경에서 자바스크립트를 실행 가능
Node.js 모듈 사용
1. 메소드
- Node.js 내장 모듈 목록
- readFile 메소드 : 파일을 읽을 때 사용
- writeFile 메소드 : 파일을 저장할 때 사용
2. 모듈 불러오기
const fs = require('fs'); // 파일 시스템 모듈을 불러옵니다
const dns = require('dns'); // DNS 모듈을 불러옵니다

//fs.readFile 메소드 등 사용 가능- DNS 모듈 : 파일 시스템 모듈은 파일을 읽거나 저장하는 기능을 구현할 수 있도록 해줌
3. 3rd-party 모듈 사용법
npm install underscore
const _ = require('underscore');- 3rd-party : 해당 프로그래밍 언어에서 공식적으로 제공하는 빌트인 모듈(built-in module)이 아닌 모든 외부 모듈
- node_modules에 underscore가 설치되었으면 Node.js 내장 모듈을 사용하듯 require구문을 통해 underscore를 사용
반응형
'CodeStates > JavaScript' 카테고리의 다른 글
| [알고리즘] 시간복잡도 (빅오표기법) (0) | 2022.04.21 |
|---|---|
| [자료구조] Stack, Queue, Graph, Tree (0) | 2022.03.14 |
| [JSON] JavaScript Object Notation (1) | 2022.03.14 |
| [JavaScript] 재귀함수 (1) | 2022.03.14 |
| [JavaScript] 객체 지향 프로그래밍 (0) | 2022.02.28 |

댓글